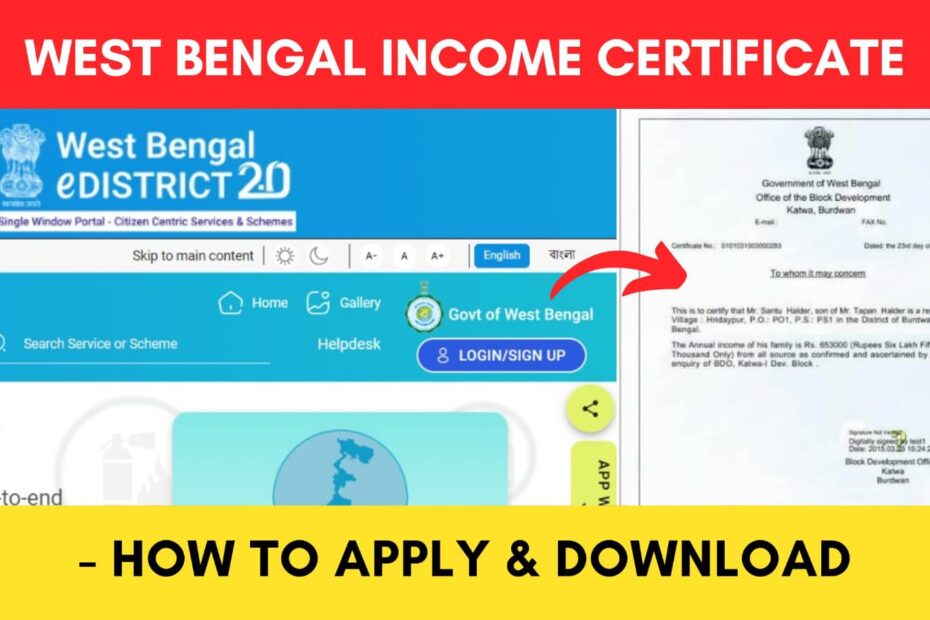
An income certificate is an official document that can be used as proof of the annual income of a person or family. In West Bengal, this document is issued by the state government and shows the income of a person or his/her family from all kinds of sources.
It is a mandatory document in various places such as during admissions in various schools and colleges, to apply for different schemes, etc.
ADVERTISEMENT
The Government of West Bengal has made it easier to apply for an Income Certificate online through their official e-District portal at edistrict.wb.gov.in.
In this article, you will get to know the following points about the West Bengal Income Certificate,
- Eligibility
- Documents
- Fees
- Steps to apply
- How to check application status
- Time to issue certificate
- Steps to download income certificate
Let’s see each of these points in detail.
Eligibility to obtain Income Certificate in West Bengal
The eligibility criteria that you need to fulfill to obtain the income certificate are,
- You must be a permanent resident of West Bengal.
ADVERTISEMENT
Documents required to obtain an Income Certificate
The documents that you need to obtain an income certificate from the Government of West Bengal are,
- Residential proof (such as Aadhar card, ration card, etc.)
- Income proof (such as salary certificate, income proof from gram Panchayat/municipality, income tax return acknowledgment, etc.)
- Passport-size photo.
Fees for obtaining Income Certificate in West Bengal
The Income Certificate is provided free of charge by the Government of West Bengal. You can easily apply online through the e-district portal.
Steps to apply for BDO/SDO/DM income certificate online
To apply online for the BDO/SDO/DM income certificate in West Bengal,
Step 1: Go to the official website
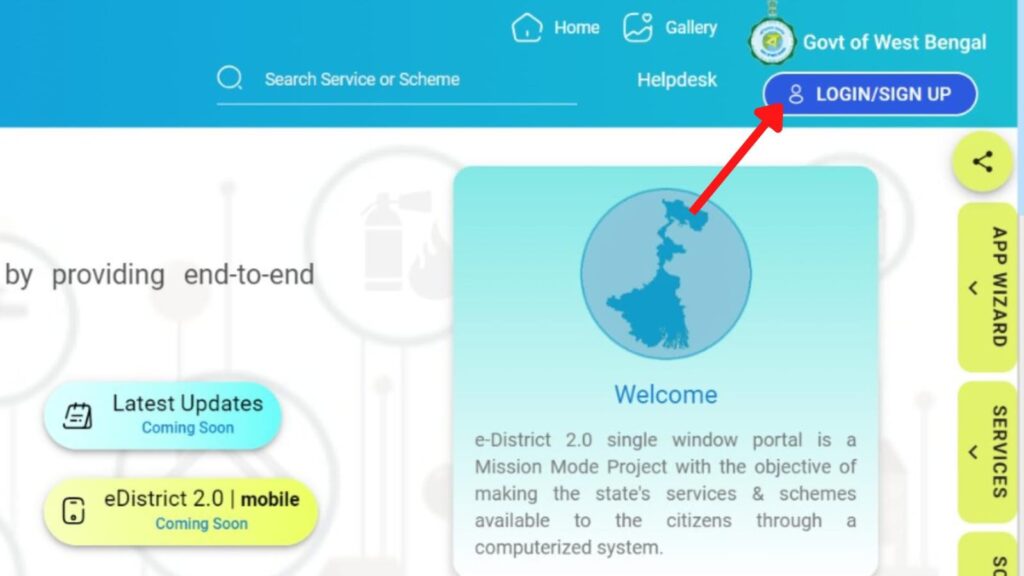
- First, go to the official website of the West Bengal e-district portal at edistrict.wb.gov.in.
- Next, click on the ‘LOGIN/SIGNUP’ button.
- Next, enter your Username, enter the captcha code, and click on the Signin button.
In case you don’t have an account on the portal, you need to register first.
Click to know the steps to register on the eDistrict portal.
Step 2: Open the Income Certificate application form
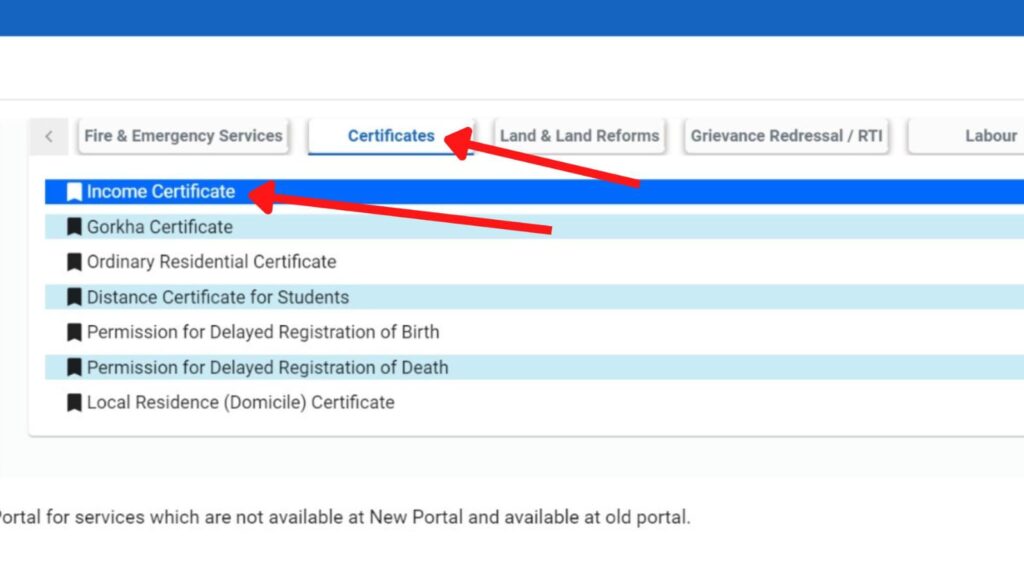
- Now, click on the ‘Service’ button on the right side of the screen.
- Next, click on the ‘Certificate’ option.
- Next, click on the ‘Income Certificate’ option.
- A popup will appear.
- Next, click on the ‘Accept’ button.
ADVERTISEMENT
Step 3: Enter the applicant’s details
- Next, select the ‘Salutation’ from the given options.
- Next, enter the ‘First Name’, ‘Middle Name’, and the ‘Last Name’ in the specified fields.
- Next, select the ‘Date of Birth’ from the calendar symbol. The age will be automatically filled.
- Next, select the ‘Gender’ from the given options.
- Next, enter the ‘Adhaar No.’ and ‘Pan Number’ in the specified fields. (optional)
- Next, enter the ‘Email’ and the ‘Mobile No.’ in the specified fields.
Step 4: Verify mobile number
- Next, click on the ‘Verify’ button beside the mobile number.
- An OTP will be sent to your registered mobile number. Enter it in the specified field.
- Next, click on the ‘Validate’ button.
ADVERTISEMENT
Step 5: Enter the Present Address of the applicant
- Next, enter the ‘Address Line 1’ and ‘Address Line 2’ in the specified fields.
- Next, enter the Pin Code’, in the specified field. ‘Country’ and ‘State’ will be automatically filled.
- Next, select the ‘District’, ‘Sub Division’, and ‘Rural or Urban’ from the specified field.
- Next, select the ‘Block/Municipality/Municipal Corporation’, and the ‘Block/Municipality/Municipal Corporation Name’ from the specified field.
- Next, select the ‘Village/Ward’ and ‘Post Office’ from the specified field.
- Next, enter the ‘Police Station’ in the specified field.
- Next, click on the ‘Save and Next’ button.
Step 6: Enter permanent address and family details
- Next, select the ‘Present Address’ option under ‘Same Address as’, if your present and permanent address are the same. If not, fill in the required details.
- Next, select the ‘Applicant is Minor/student’ from the given options.
- Next, select the ‘Special Case’ from the given Options.
- Next, click on the ‘Add Row’ button and then click on the ‘OK’ button.
- Next, select and enter the ‘Guardian Details’ as needed.
- Next, click on the ‘OK’ button.
- Next, click on the ‘Save and Next’ button.
ADVERTISEMENT
Step 7: Enter the income details
- Next, enter the ‘Monthly Income of the Applicant’ in the specified field.
- Next, enter the ‘Details of Business or Service’ in the specified field.
- Next, select the ‘Reason for Application’ from the given options. If there is any other reason, enter it under the ‘Other Reason for Application’.
- Next, click on the ‘Save’ button.
Step 8: Submit the application
- Next, click on the ‘Preview’ button.
- All the details will be shown on the screen.
- Next, close the pop-up and click on the ‘Submit’ button.
- A new page will open.
Step 9: Upload the supporting documents
- Next, select the ‘Document Name’ and then upload the file attachment under ‘Residential Proof’ by clicking on the ‘Attach file’ option.
- Next, upload the ‘Photograph’ in the specified field.
- Next, select the appropriate option and upload the file attachment under ‘Income Proof’ by clicking of ‘Attach file’.
- Next, tick the ‘I accept’ box.
- Next, click on the ‘Save’ button.
- A new page will open.
ADVERTISEMENT
Step 10: Download acknowledgement
- Next, click on the ‘Submit’ button.
- A pop-up will appear.
- Next, copy the AIN and download the acknowledgment by clicking on the ‘Download’ button.
- Next, click on the ‘Close’ button.
You can take a printout of the acknowledgment page and save it for further reference.
How to check the status of your Income Certificate application
To check the application status of your income certificate application,
- First, go to the official website of the West Bengal e-district portal.
- Next, log into your account.
- Once you are logged in, the list of all your applications will be shown on the dashboard.
- Next, click on the ‘Track Case Status’ option under the ‘Actions’ header of the appropriate application.
- The status of your Income Certificate application will be displayed.
ADVERTISEMENT
Time taken to issue an Income Certificate in West Bengal
It takes about 7 working days to issue the income certificate after submission of the application online or offline.
Steps to download income certificate from the e-District portal
After your Income Certificate application has been approved, you can download your certificate online.
To download your Income Certificate,
- First, go to the official website of the West Bengal eDistrict portal at edistrict.wb.gov.in.
- Next, log into your account.
- Once you are logged in, the list of all your applications will be shown on the dashboard.
- Next, click on the ‘Download Certificates’ option under the ‘Actions’ header of the appropriate application.
- A new page will open showing your certificate PDF. Download the certificate by clicking the download button.
More e-District Portal related articles
- How To Apply & Download Certified Copy Of Deed In West Bengal
- How To Apply & Download West Bengal Local Domicile Certificate
- West Bengal e-District Portal Registration Process Online 2024
- BDO/SDO/DM Income Certificate in West Bengal Online 2024
Disclaimer: The Information provided above is for educational purposes only. The images used are for representative purposes only.